How to Use OBS to Stream on Twitch?
Getting Started with Twitch Streaming Using OBS:
Ready to share your gaming skills or creative content with the world? Streaming on Twitch is an exciting way to build a community and showcase your talents. But how do you get started? In this guide, we’ll walk you through the process of using OBS (Open Broadcaster Software) to stream on Twitch. OBS is one of the most popular tools for streamers because it’s free, open-source, and packed with features that can help you create professional-quality streams. Whether you’re a complete beginner or a seasoned streamer looking to enhance your setup, OBS offers the flexibility and tools to meet your streaming needs. By the end of this guide, you’ll know how to set up OBS, add eye-catching overlays, and confidently go live on Twitch, ready to entertain and engage your audience. Let’s dive in and help you start your streaming journey on the right foot!
Setting Up OBS for Your First Stream:
-
Overview:
- Before streaming, download, install, and configure OBS for Twitch.
Download and Install OBS:
-
Step 1 – Download OBS:
- Go to the official OBS website and download it for your operating system (Windows, macOS, or Linux).
-
Step 2 – Install the Software:
- Follow the installation instructions. It’s simple and quick.
Configuring OBS for Twitch:
-
Step 1 – Link OBS to Twitch:
- After installation, configure OBS to stream to Twitch by linking your Twitch account.
-
Step 2 – Stream Key Setup:
- Input your Twitch stream key into OBS so it knows where to send your stream.

Connect Your Twitch Account:
To start streaming on Twitch, you need to connect your account to OBS. Open OBS and navigate to “Settings.” Under the “Stream” tab, select “Twitch” as your streaming service. You can either directly connect your Twitch account or manually enter your stream key from Twitch. If you’re unsure where to find the stream key, log in to your Twitch account, go to your dashboard, and you’ll find it under “Stream Key & Preferences.” Connecting your account is an essential step in linking OBS to Twitch, allowing you to broadcast your content directly to your channel.
Choosing the Right Streaming Settings and Adding Overlays:
Once your Twitch account is linked, it’s important to configure the right video and audio settings for a smooth streaming experience. For most users, a resolution of 720p at 30 frames per second (fps) provides a good balance between quality and performance. Ensure your audio is set up properly so that viewers can hear your voice clearly. After that, it’s time to make your stream visually appealing by adding overlays. Overlays can include webcam frames, alerts for new followers, and other visual elements that enhance the overall look of your stream. They help personalize your stream and engage your audience more effectively.
What Are Twitch Overlays?
Twitch overlays are visual elements that appear over your stream, helping to add personality, branding, and useful information to your content. These overlays can show details like your social media handles, chat boxes, donation alerts, or simply decorative elements to make your stream more visually appealing. They help keep your audience engaged and provide a professional look that can set your stream apart from others.
How to Add Overlays in OBS?
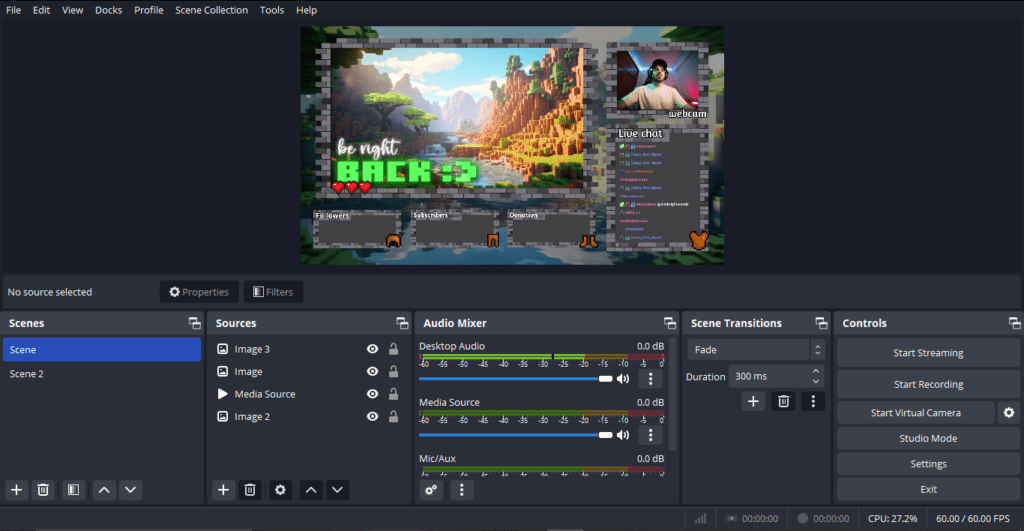
Adding overlays in OBS is a straightforward process. First, collect your overlay files—whether you’re using free ones or custom designs. In OBS, navigate to the “Sources” panel and click the “+” icon. Then, select “Image” if you’re adding an image overlay, or choose “Browser” for web-based overlays. Upload your file and adjust its size and position on your screen to fit your stream layout perfectly. Whether you go for free overlays or invest in paid ones, the key is to ensure your overlays match your brand and create a visually appealing experience for your viewers.
Tips for Customizing Overlays:
-
Overlay Customization:
- Resize, move, and animate overlays in OBS.
- Experiment with settings but avoid cluttering your screen with too many elements.
Setting Up Your Streaming Environment:
-
Organize Your Setup:
- A clean, organized streaming environment enhances the viewer experience.
- Focus on creating an engaging, visually appealing space.
Optimizing Audio and Video Quality:
-
Improve Audio/Video:
- Invest in a quality microphone and camera.
- Adjust bitrate and resolution in OBS to suit your internet speed and hardware.
- Test different settings for the best balance of quality and performance.
Managing Stream Layouts in OBS:
-
Use Scenes for Layouts:
- Control stream layouts using scenes in OBS.
- Switch between different setups, such as one for gameplay and another for chatting.
Scene Transitions and Effects:
-
Add Professional Touches:
- Use OBS’s built-in scene transitions to switch smoothly between scenes.
- Customize transitions and add sound effects for a more polished stream.
Going Live on Twitch:
Once you have OBS configured and your overlays set, it’s time to go live! This is the exciting moment when you get to broadcast your content and interact with your audience in real-time. To start your stream, simply press the “Start Streaming” button in OBS. Your stream will go live on Twitch almost instantly. Keep an eye on OBS for any potential issues like dropped frames or a weak connection, and adjust as needed to ensure a smooth streaming experience.
Engaging with Your Audience and Managing Alerts:
Interacting with your viewers is crucial to building a loyal community on Twitch. Engage with your audience by talking to them, responding to chat messages, and keeping the conversation flowing. OBS allows you to easily monitor chat within the interface, making it convenient to stay connected. Additionally, tools like Streamlabs or Stream Elements can help manage chat and stream alerts. These tools notify you when someone follows, subscribes, or donates, making it easy to thank your supporters and keep your stream engaging.
Conclusion:
Streaming on Twitch with OBS might feel inviting at first, but once you get the hang of it, it becomes alternate nature. Remember to keep your setup simple, engage with your audience, and most importantly, have fun. Over time, you’ll find what works best for you and your community. Good luck, and happy streaming!
FAQs:
Q1: What are the best settings for streaming on Twitch using OBS?
The best settings depend on your computer’s specs and internet speed, but a good starting point is 720p at 30fps with a bitrate of around 2500 kbps.
Q2: Can I stream on Twitch without overlays?
Yes, you can stream without overlays, but they add a professional touch and make your stream more engaging for viewers.
Q3: How do I add music to my Twitch stream using OBS?
You can add music by using the “Audio Input Capture” or “Media Source” options in OBS to play music from your computer or an external source.
Q4: Is OBS the only software I can use to stream on Twitch?
No, there are other options like Streamlabs OBS, XSplit, and Twitch Studio, but OBS is the most popular due to its flexibility and powerful features.
Q5: How can I reduce lag while streaming on Twitch using OBS?
To reduce lag, lower your stream resolution, close unnecessary background programs, and ensure your internet connection is stable and fast.


No Comments